If you have been pulling soggy fries out of your air fryer or cutting into chicken that is beautifully brown on top and somehow still pale on the bottom, you are not alone. I cooked in a studio apartment for four years and thought the problem was the appliance. It was not. It was the technique. The Cosori TurboBlaze Air Fryer is genuinely capable of restaurant-quality crispiness, but getting there consistently requires five specific habits. Once I figured them out, I stopped ordering takeout on Tuesday nights.
This guide walks through each step in order. Whether you are making fresh-cut fries, bone-in chicken thighs, frozen fish fillets, or roasted broccoli, the same five principles apply. The Cosori TurboBlaze handles all of them well because of its TurboBlaze fan system, which circulates heat faster and more evenly than most air fryers in this price range. But even the best fan cannot fix a wet basket or an overcrowded tray. That is on us.
Using a Cosori TurboBlaze? Check Today's Price Before You Start Shopping Around
The Cosori TurboBlaze Air Fryer has a 6 Qt PFAS-free ceramic basket, 9 cooking presets, and a TurboBlaze fan that cuts cook times by up to 46%. It is currently one of the highest-rated compact air fryers on Amazon with over 20,000 reviews.
Amazon Check Today's Price on Amazon →Step 1: Preheat the Air Fryer for Three Minutes
Most air fryer recipes say preheat is optional. Skip that advice. A cold basket is one of the fastest ways to get a steamed result instead of a crispy one. When food hits a hot basket, the surface moisture flashes off quickly and the Maillard reaction (the browning process) starts immediately. When food hits a cold basket, it sits in a warming environment that slowly cooks it through before the outside has a chance to crisp.
On the Cosori TurboBlaze, press the preheat icon and let it run for three minutes at your target cooking temperature. You will hear the fan ramp up and the basket will be genuinely hot when you open it. Use silicone-tipped tongs to avoid burns. This three-minute habit is the single change that made the biggest difference in my results. Fries went from limp to snappy in the same total cook time just by adding the preheat.
For frozen foods, increase preheat to 400F even if your recipe calls for 375F. The thermal shock when frozen food hits a 400F basket helps set the outer crust before the inside thaws and releases moisture.
Step 2: Dry Your Food Completely Before It Goes In
Moisture is the enemy of crunch. This applies to fresh vegetables, raw chicken, fresh-cut potatoes, and even some frozen items with ice crystals on the surface. Before anything goes into the basket, pat it completely dry with paper towels. For chicken thighs with skin, press firmly and repeatedly. The skin should feel almost papery before seasoning. For vegetables, spin them in a salad spinner first, then blot. For fresh potatoes, cut them, soak in cold water for 20 minutes to pull out excess starch, then dry them thoroughly before tossing in oil.
The science is simple: water needs to turn into steam before the surface can brown. If there is a lot of moisture in the food, the air fryer spends the first half of the cook time driving off that water. By the time it gets to browning, the food may already be fully cooked through. You get gray, soft exteriors on food that is correctly cooked inside. Drying first means the surface is ready to brown from the first minute.

Step 3: Use a Light, Even Coat of Oil on Every Surface
Air fryers do not need much oil, but they do need some. The fat carries heat to the surface of the food and acts as the medium that conducts the Maillard browning. A totally dry piece of chicken breast will cook through but it will look matte and pale. A light coat of avocado oil or olive oil gives it that golden, restaurant-quality look and a satisfying crunch when you cut into it.
The key word is light. You are not deep frying. For most foods, a teaspoon to a tablespoon of oil per pound of food is all you need. The most effective way to apply it is a spray bottle with a fine mist, which gets even coverage without pooling. Toss vegetables in a bowl with oil before they go in. For chicken pieces, brush oil on with a pastry brush and then flip and brush the other side. Do not forget the bottom surface: it is the one sitting directly on the basket, and without oil it stays dry and pale.
One note specific to the Cosori TurboBlaze: its PFAS-free ceramic coating is non-stick, which means you do not need to spray the basket itself. Spraying the food is enough. Avoid aerosol sprays like Pam directly on the basket because the propellants in those cans can damage non-stick coatings over time. Use a refillable oil mister instead.
Step 4: Never Overlap Food in the Basket
This is the rule most people break, especially with fries. The Cosori TurboBlaze has a 6 Qt basket, which holds a generous single layer of food, but it cannot crisp a pile. The TurboBlaze fan circulates hot air around every piece of food, and that airflow is what creates the crunch. Stack food on top of itself and you block the airflow on the bottom layers. The top layer gets crispy and the bottom layers steam against each other.
For fries, spread them in a single layer with visible space between each fry. Yes, this means cooking in batches if you are making fries for more than one person. Keep the first batch warm in a 200F oven while you finish the second. For chicken thighs or drumsticks, lay them skin-side down in a single layer and do not let them touch. For broccoli florets, spread them across the basket so every cut surface faces either up or into empty air space.
If you are cooking for a family and single-layer batches feel impractical, the Cosori TurboBlaze's 6 Qt capacity is one of the roomier options in its class. Most apartment-friendly air fryers top out at 4 Qt and can only handle one or two servings at a time. The 6 Qt gives you enough room to do a full meal for two in one go as long as you stay disciplined about the single layer.
Stack food on top of itself and the fan cannot reach the bottom layers. The top gets crispy, the bottom steams. Single layer, every time.
Step 5: Flip Halfway Through and Add a Shake
Even in a well-designed air fryer with top-down airflow, the surface that sits against the basket gets less direct heat than the surface facing the fan. Flipping halfway through ensures both sides get that direct radiant heat from the fan. For anything with a skin side (chicken thighs, salmon fillets, pork chops), flip to skin-side up for the second half of the cook time so the skin gets the hottest, most direct heat at the end.
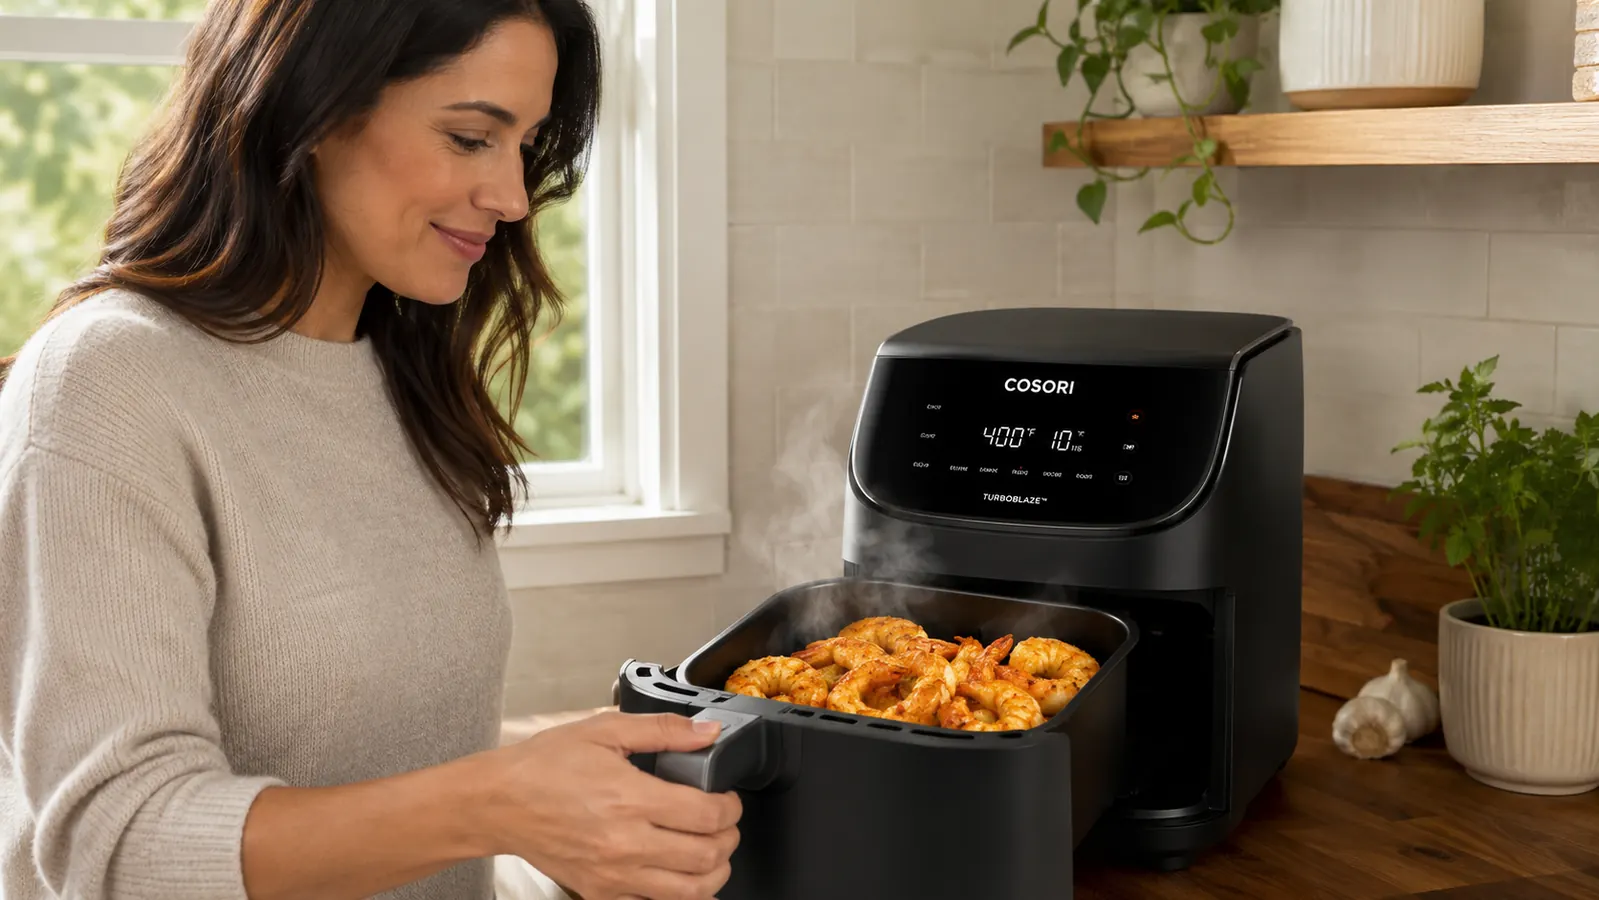
For small items like fries, cubed potatoes, broccoli, and Brussels sprouts, a shake works better than a flip. Pull the basket out at the halfway mark and give it a firm shake so every piece rotates and exposes a new surface. The Cosori TurboBlaze basket is designed with a pull-tab that lets you shake without removing the whole unit. Do this over the sink the first time in case any oil drips.
The Cosori TurboBlaze will beep and prompt you to shake at the midpoint when you use certain presets. That reminder is genuinely useful, especially when you are multitasking in a small kitchen. If your food does not look quite as brown as you want when you check at the halfway point, you can also add two or three minutes to the back end of the cook time. The TurboBlaze's digital display makes it easy to adjust on the fly.
What Else Helps: Small Habits That Add Up
Beyond the five core steps, a few smaller habits make a consistent difference. First, season after drying but before oiling. Salt draws moisture out of food, so if you salt fresh vegetables or chicken and then let them sit for a few minutes, you will see liquid forming on the surface. Blot that off, then apply oil. This sequence: dry, season, rest briefly, blot, oil, basket.
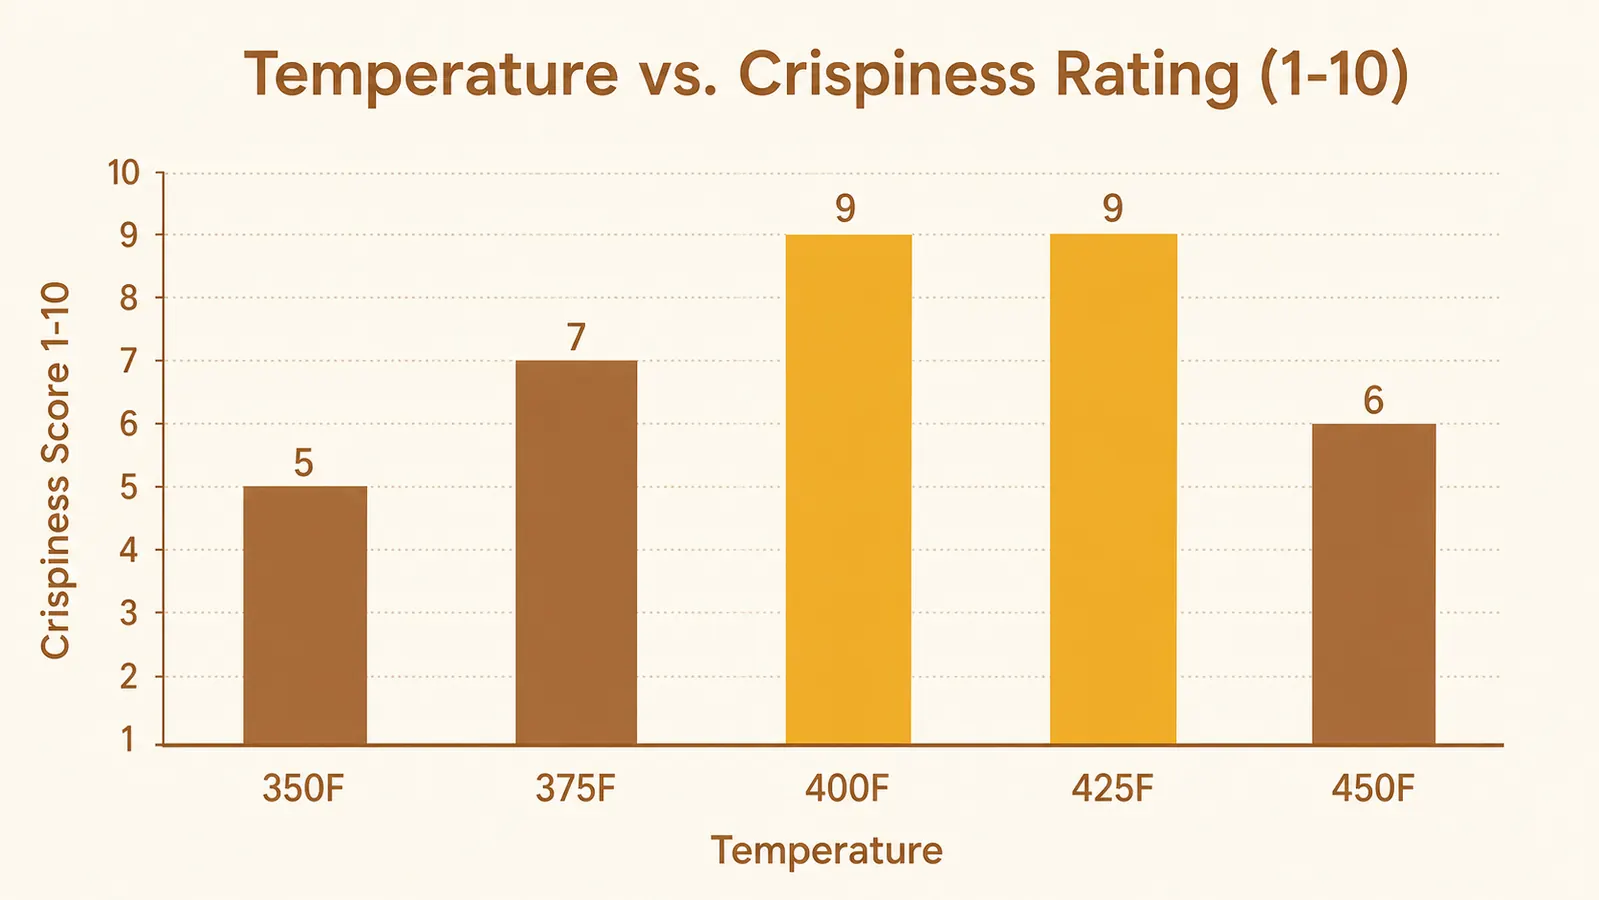
Second, use the right temperature for what you are cooking. High heat (400F to 420F) is for things you want to shatter: fries, chicken wings, breaded items. Medium-high heat (375F to 390F) is for bone-in chicken, thick fish fillets, and chunky vegetables where you need time for the inside to cook through without burning the outside. Medium heat (350F to 375F) is for delicate things like asparagus spears or thin-cut pork tenderloin. The Cosori TurboBlaze's temperature range of 90F to 450F gives you room for all of these, and the precise digital controls make it easy to dial in exactly what you need.
Third, do not crowd the seasoning. A thin, even coat of spices or breadcrumbs crisps better than a thick crust. If you are breading chicken, press the breadcrumbs on firmly and let the coated pieces rest on a rack for five minutes before they go in the basket. This helps the coating adhere and dry out slightly, which means it will not slide off or go gummy in the air fryer.
Finally, let things rest for two minutes after cooking. This is the same principle as resting a steak: the residual heat continues to firm up the exterior and the interior moisture redistributes. Fries that feel almost-crispy when they come out of the basket often finish crisping in those two minutes on a wire rack. Putting them back in a closed bowl or container traps steam and undoes your work.
Fries that feel almost-crispy when they come out often finish crisping in two minutes on a wire rack. A closed container traps steam and undoes the whole cook.
The Cosori TurboBlaze Makes These Steps Simple in a Compact Package
If you are still shopping for an air fryer or thinking about upgrading from an older model, the Cosori TurboBlaze's ceramic PFAS-free basket, precise temperature control from 90F to 450F, and built-in shake reminder make it one of the easier air fryers to get consistently great results from. Over 20,000 Amazon reviewers and a 4.8-star rating back that up. Check current pricing below.
Amazon Check Today's Price on Amazon →