
If you have ever tried to ladle boiling hot soup into a countertop blender, you know the exact moment things go wrong. The lid lifts, steam pressure builds, and suddenly your butternut squash bisque is on the ceiling. I made that mistake exactly once in my galley kitchen on the third floor of a walk-up apartment, and I have not touched a full-size blender for soup since. The Braun MultiQuick 5 immersion blender changed that, and changed it for good. I blend right in the pot, right on the stove, without moving a single heavy vessel or burning a single finger.
This guide walks you through every step of getting silky, restaurant-smooth results from the Braun MultiQuick 5, whether you are making a simple blended vegetable soup, a pan sauce for chicken thighs, a quick pesto, or a smoothie. The technique matters more than you might think, and a few small adjustments at each stage make the difference between gritty and glossy.
Tired of chunky soup when you wanted velvet? The Braun MultiQuick 5 blends right in the pot.
With 350 watts, dual speed, a Turbo boost, and Braun's patented splash-guard bell design, the MultiQuick 5 is built for exactly this. Rated 4.6 stars across nearly 6,000 reviews on Amazon.
Amazon Check Today's Price on Amazon →Step 1: Set Up Your Pot and Ingredients Correctly
Before you even plug in the blender, your setup makes or breaks the final texture. Use a pot that is deep enough so the blending bell sits fully submerged in the liquid. For soups, I target at least three to four inches of liquid above the blade. If you are working with a smaller batch, tilt the pot slightly off-center so the liquid pools deeper on one side. This is one of those small-kitchen tricks that makes a real difference when you are working with a quart or less.
Make sure your vegetables are fully cooked and genuinely soft before you start blending. The Braun MultiQuick 5 handles fibrous produce like roasted carrots or butternut squash well on Turbo, but if your vegetables still have any resistance to a fork, they will leave stringy bits in the final soup. Simmer until a butter knife slides through with zero effort. For thicker preparations like hummus or a blended bean soup, add a splash of liquid before you blend so the blades have something to work with from the first pulse.
One quick safety note that applies every time: turn off the heat source before you blend. The Braun MultiQuick 5 is designed to be used in hot liquids, but blending over an active flame is not worth the risk and it is not necessary. Pull the pot to a cold burner or set it on a trivet. You lose almost no heat in the thirty to sixty seconds it takes to blend a batch of soup smooth.
Step 2: Insert the Blender at the Right Depth and Angle
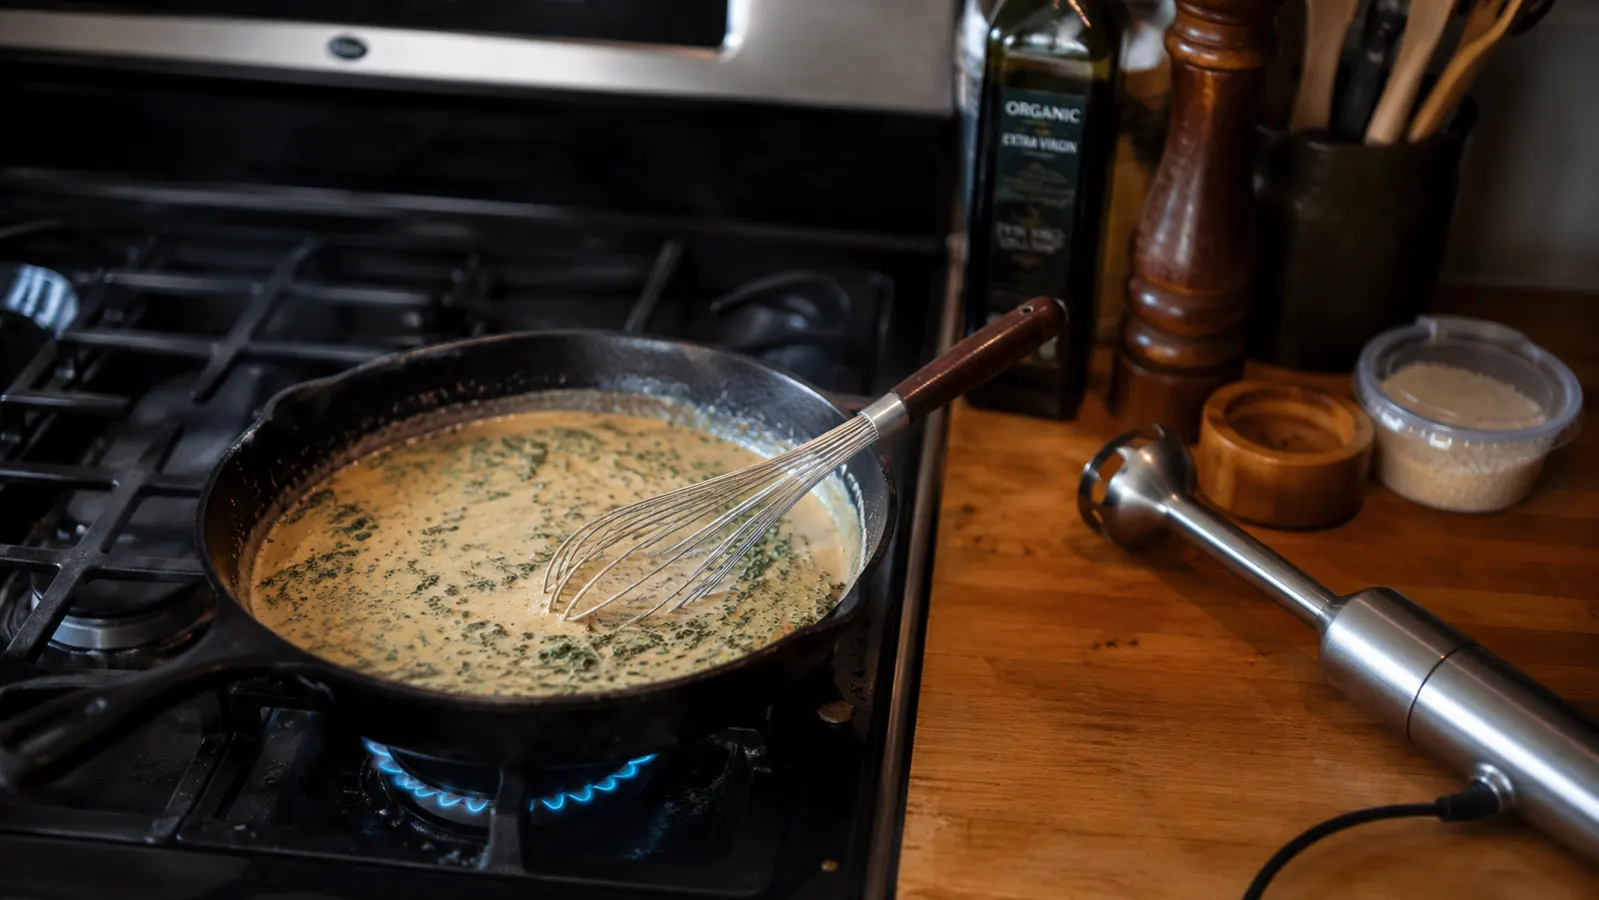
This is where most people go wrong with any immersion blender, and it is the biggest single factor in whether you get silky results or a splattered stovetop. Lower the Braun MultiQuick 5 into the liquid before you turn it on. Always. The blending bell should be fully submerged, with the blade guard sitting at least an inch below the surface. If you switch it on in air, even for a half second, you will get a spray pattern that reaches further than you expect.
Braun's patented bell design on the MultiQuick 5 is specifically engineered to pull liquid inward and down, which reduces splash compared to other stick blenders I have used. But the design still works best when the bell is fully covered. Tilt the blender at a slight angle, around fifteen to twenty degrees off vertical, rather than holding it perfectly straight up and down. That tilt creates a gentle vortex that draws in chunks from around the pot rather than just churning the spot directly below the blade.

Step 3: Start on Low Speed, Then Bring in the Turbo
The Braun MultiQuick 5 has two main speeds plus a Turbo button. Start on low speed for the first pass through any hot soup or sauce. Low speed is gentler on texture and creates less splash. Work the blender in slow circles around the bottom of the pot, moving it through the thicker areas and chunks first. You are not trying to finish the job on this pass; you are breaking down the largest pieces so the next pass can work efficiently.
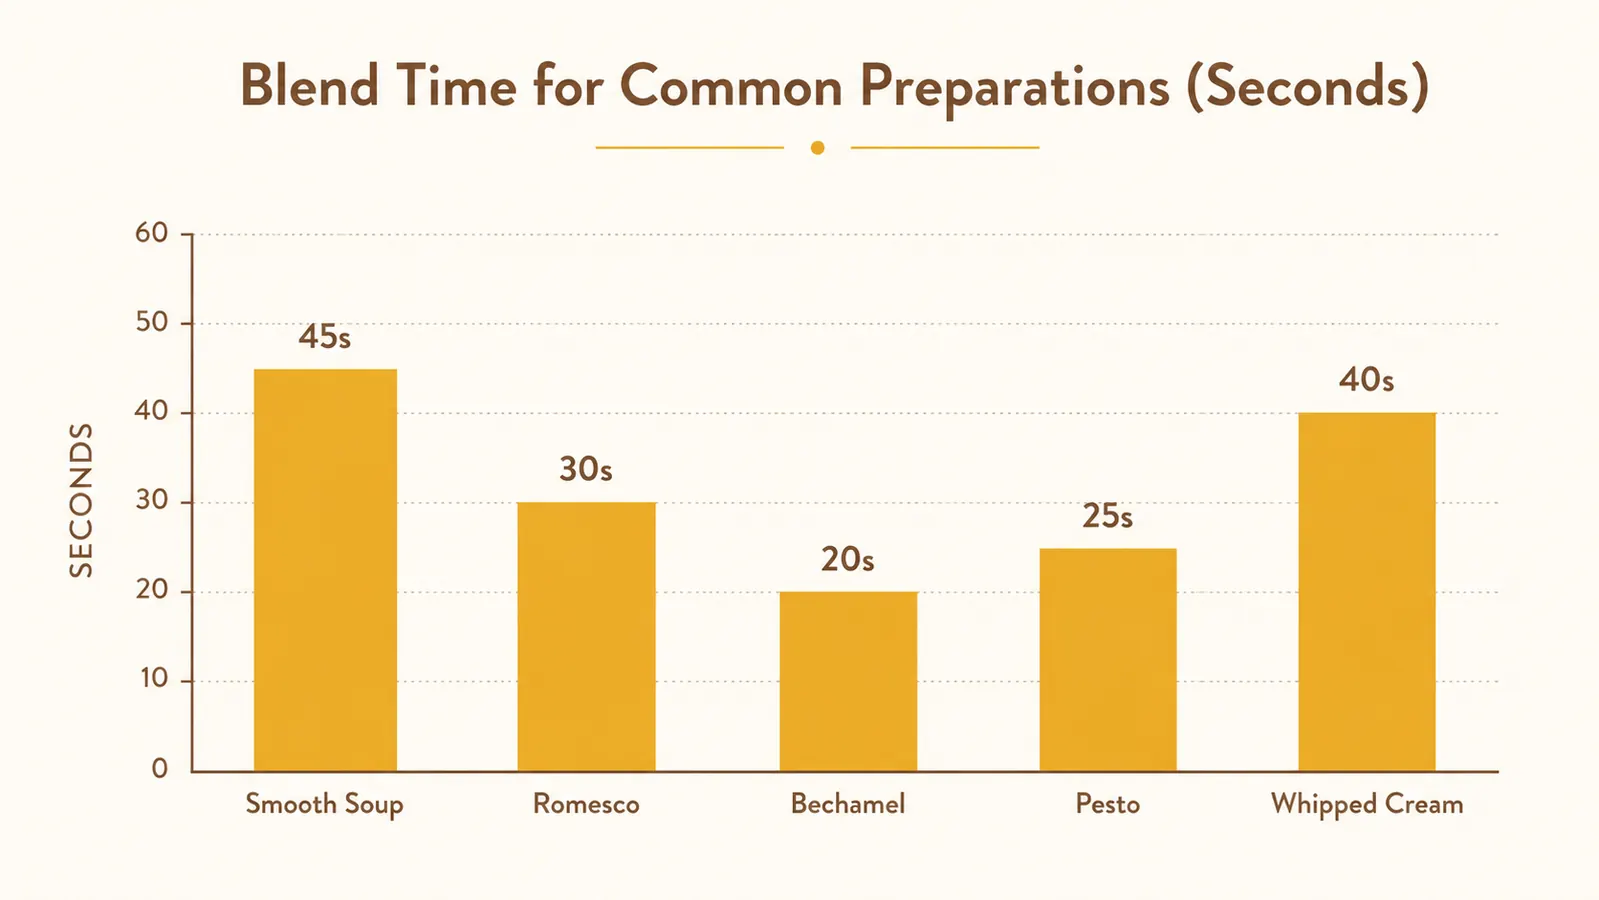
Once the biggest pieces are gone and the soup is partially smooth, switch to high speed or engage the Turbo button for fifteen to twenty second bursts. Move the blender continuously during Turbo pulses rather than holding it in one spot. The Turbo is particularly useful for fibrous vegetables like roasted parsnips, lentil soups, or anything with a skin like tomatoes or red peppers. Between bursts, lift the blender slightly and reposition it to reach any remaining chunks at the edges of the pot. For most pureed soups, three or four Turbo bursts of twenty seconds each are all you need.
Start on low to break things down, then bring in Turbo for the final push. That two-stage approach is the difference between almost smooth and actually smooth.
Step 4: Test Texture and Adjust Before Serving
Lift the blender out while it is still running, let it slow to a stop before you set it down, and then test the texture. Dip a clean spoon into the soup and run your finger along the back of the spoon. A properly blended bisque coats the spoon evenly and leaves a clean line when you run your finger through it. If you see granules or streaks, you need another Turbo pass. If the soup is thick but textured rather than smooth, add two to three tablespoons of warm stock or cream and blend for another ten seconds on high.
For pan sauces and gravies, the test is slightly different. You want the sauce to ribbon off the spoon in a thin, unbroken stream. If it drips in blobs, blend for another fifteen seconds and check again. If it ribbons too thin and you want more body, simmer it uncovered for two to three minutes after blending to reduce and thicken. The Braun MultiQuick 5 handles all of this well, including deglazing sauces where there is fond from searing at the bottom of the pan, though you want to scrape up any stubborn browned bits with a wooden spoon before you blend.

Step 5: Clean Up in Under Two Minutes
This is the step nobody talks about enough, and it is honestly one of the best things about using the Braun MultiQuick 5 in a small kitchen. After you finish blending, fill a tall glass or a deep mug with warm soapy water. Lower the blending bell into the water and run the blender on low for ten seconds. The rotation of the blade pushes the soapy water through the bell and cleans ninety percent of the residue in seconds. Rinse under the tap, and you are done.
The blending shaft and bell on the MultiQuick 5 detach from the motor body by pressing the release button on the back of the grip. The detachable part is dishwasher safe, though I hand-wash it because it takes thirty seconds and I would rather save the dishwasher space for actual dishes. The motor body wipes clean with a damp cloth. Never submerge the motor housing. In a small kitchen where counter space doubles as prep space, having a tool that cleans this quickly without leaving a blender jar, a lid, and a blade assembly to deal with is genuinely meaningful.
What Else Helps
A few things make the Braun MultiQuick 5 work even better once you have the core technique down. First, keep the blending bell clean between uses rather than just between batches. If you blended a garlicky soup last week and now you want to make a fruit smoothie, any residue on the bell carries over. The quick glass-of-soapy-water clean between uses takes ten seconds and keeps flavors from bleeding into each other.
Second, use the low speed setting for smoothies with yogurt or dairy. Dairy can over-aerate at high speed and turn your smoothie frothy rather than creamy. Low speed or a short Turbo burst gives you a smooth texture without the foam. For green smoothies with leafy greens like spinach, add the greens first with a small amount of liquid and blend on low until they are fully broken down before adding frozen fruit and ice. This sequence prevents large leaf pieces from getting trapped under frozen fruit and escaping the blade.
Third, if you cook for one or two people and frequently work with small volumes, a tall narrow container works better than a wide pot. The Braun MultiQuick 5 comes with a 600ml beaker, which is useful for smaller batches of sauces, dressings, and pestos. For a single-serving smoothie or a quick blended salad dressing, the beaker is easier to work with than a pot. The narrow diameter keeps the liquid circulating tightly around the blade so every bit gets blended evenly. If you want a deeper look at how the MultiQuick 5 compares to other blenders for small kitchens, check out the Braun MultiQuick 5 vs KitchenAid hand blender comparison for a full side-by-side breakdown.
If you are deciding whether the MultiQuick 5 is the right tool before diving into technique, the long-term Braun MultiQuick 5 review covers real daily-use findings across several months in a small kitchen, including what held up and what surprised me.
The beaker that ships with the MultiQuick 5 is genuinely useful, not just a marketing add-on. For single-serving smoothies or small-batch sauces, it does a better job than a pot because the narrow walls keep everything circulating around the blade.
Ready to blend soups in the pot and skip the splattered countertop blender forever?
The Braun MultiQuick 5 is a 350W hand blender with dual speed, Turbo, and a patented splash-reducing bell. It scores 4.6 stars from nearly 6,000 Amazon reviews. Check today's price below.
Amazon Check Today's Price on Amazon →